
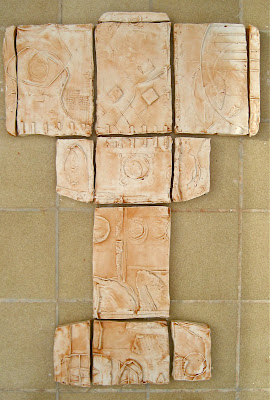
I have been wanting to do a test-run of this idea for a while. I foresee this working on a much larger scale; this manageable sample measures about 3.5 X2.5 (widest point) in feet and that's 1 meter by 75 cms for my euro-pals out there. As the perpetual teacher, I want to share the steps...
Above you see the clay slabs cut into the layout of an open box, then designed with impressions made from man-made and natural objects. You can see some of the implements on the floor.


 That's where I am at now: all the pieces have been washed and cleaned with a toothbrush. Now they must dry at least 4 days (that's in the Mallorca sun) before I can paint them.

Here you can see that clay walls have been built to control the flow of the wet plaster...

Doesn't my foot give you the sense of scale?! Anyway, here it is filled with plaster, labeled and with hooks for hanging. The tricky thing about this technique, particularly large scale, is that it has to be done all at once so that neither the clay nor the plaster harden too quickly. 3-4 hours straight, no breaks. Until this point.

A couple of hours later it is safe to pull back the clay and let the plaster air dry a bit more before washing the terra cotta clay residue off.
 That's where I am at now: all the pieces have been washed and cleaned with a toothbrush. Now they must dry at least 4 days (that's in the Mallorca sun) before I can paint them.
But Alas, I must leave this piece in limbo until mid- August. I am going to America with Malena first thing friday morning. I will be working and posting from there, but on paper pieces and actual little open boxes. Stay tuned!! Give me a few days to get there and bounce back from the long journey.
2 comments:
Aunt Laurie this will be so cool when finished. bigger is definitely better. you should press one of the smaller plaster casts in part of the bigger one. good to have you home.
Matt
wow aunt laurie, I really really love this. It will look great spaced out and hung up on your yoga wall. :)
sar
Post a Comment